
Welcome our talented Guest Designer, Allie Gower!!!
Hi, Allie here ... shivering in Minnesota, finding lots of craft time to avoid going outside. Brrr. I'm excited to be doing a Guest Design for Jillian and Bunny, and I have a little tutorial for you, their much beloved friends.
Do you have trouble finding the right container for the perfect gift you found? Or, do you find yourself needing one while stuck at home because the kids or napping, or like me, it's the wee hours of the morning?
Here's a fun way to contain your joy!

Die cut your pieces. You need two scalloped circles.
I cut two {die}Lightfully Charming Circles, one for the top, and one to "dangle"...

Make your "tube" to fit your goodies.
I used scrap paper, and I'm wrapping a large bracelet, so I
just made sure it wrapped around loosely.
I backed my "tube" and reinforced it with white cardstock and brads.
You can make shapes too, like squares, or octagons - just add creases.
You can wrap anything with a little effort, am I right?
You'll need a second "tube" for the lid.
The lid needs to be slightly larger than the base, so wrap the second
"tube" around the base to be sure it fits loosely.

Add some tabs.
I cut one inch pieces and folded them in half.
Glue these flush to the top for the lid, and
on the bottom for your base.
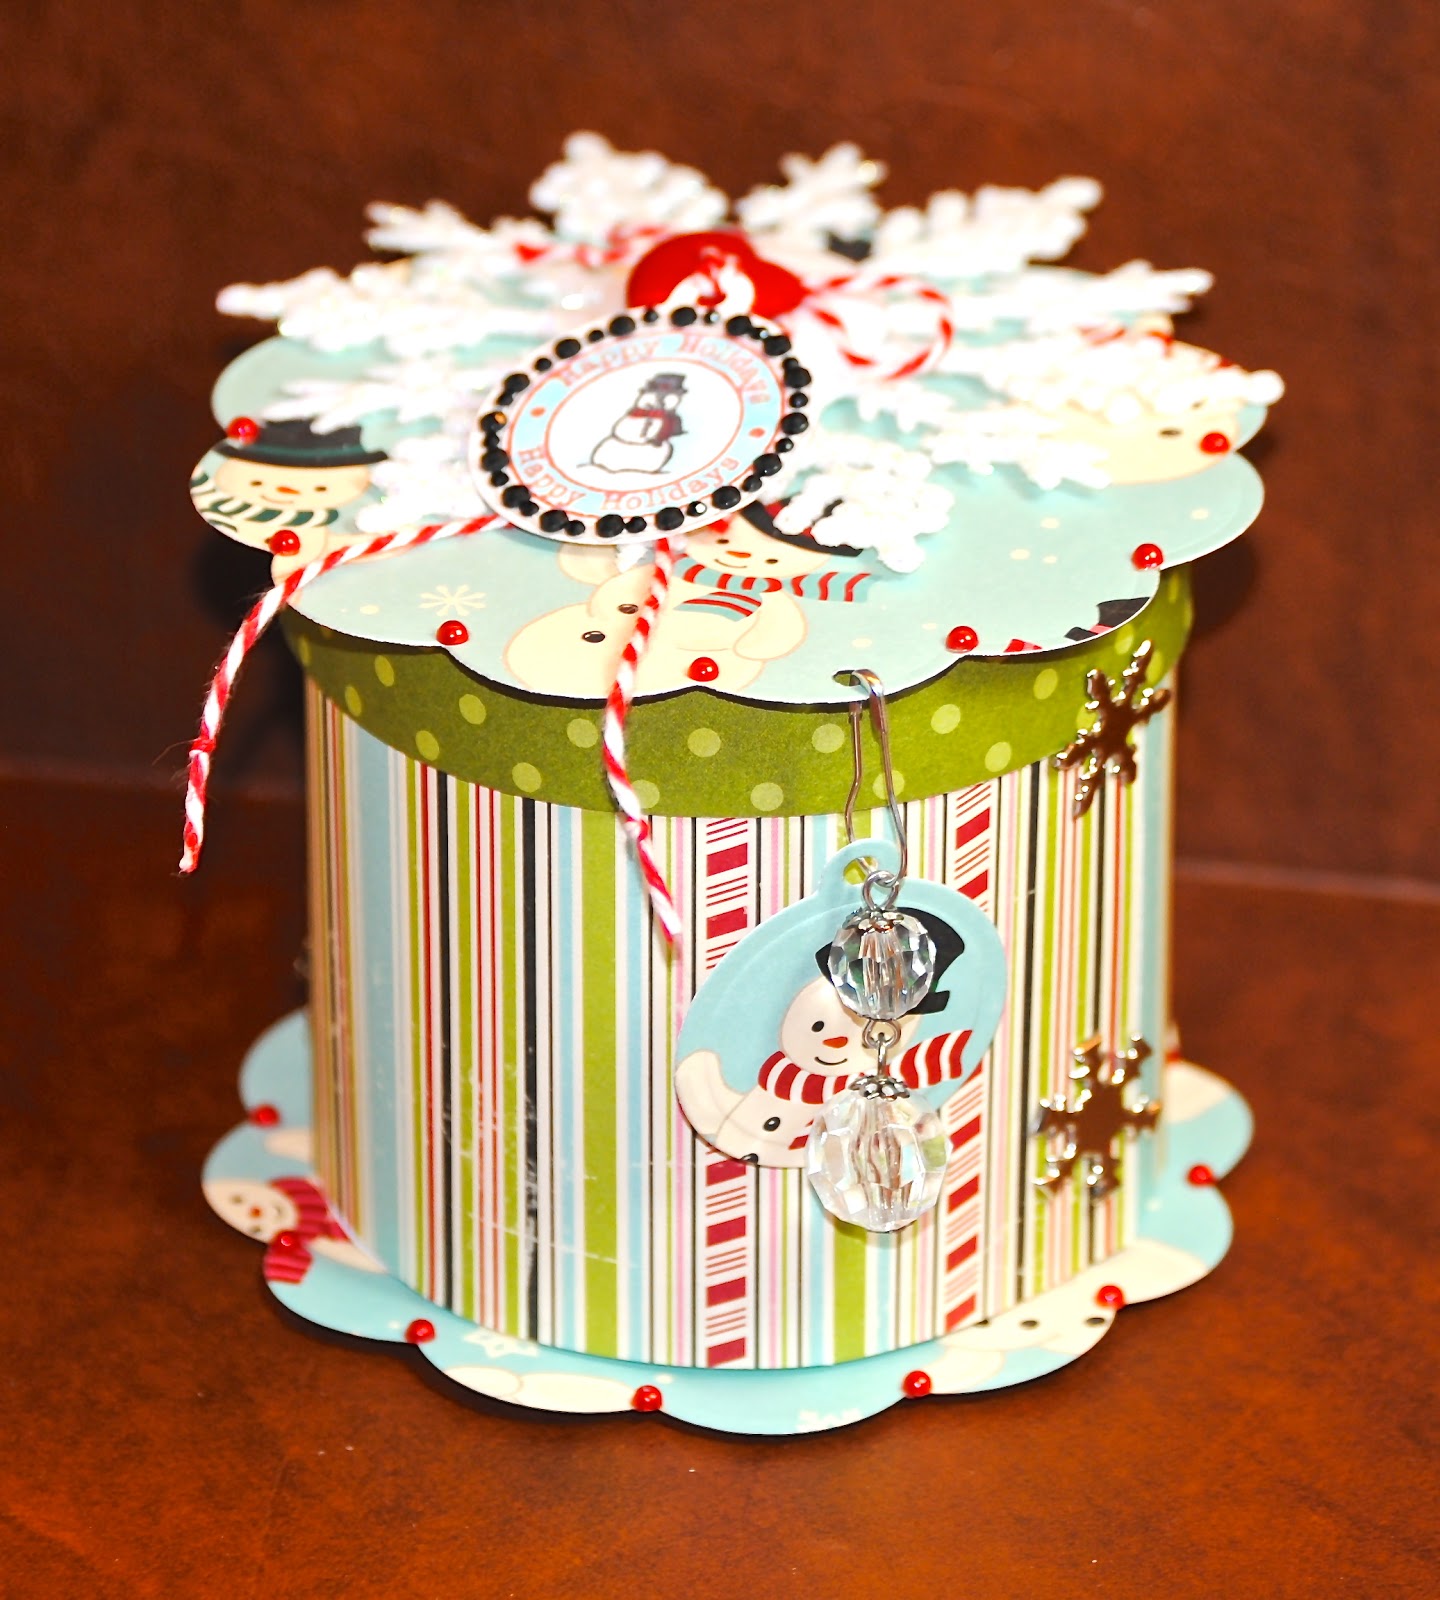
Add circles - you can trace - I used a Spellbinders circle that seemed to nest well.
The bottom one will be a tighter fit.
I used striped paper for the base, and polka dots for the lid,
so orientation wasn't important.
Use caution and be sure you're gluing the right sides.
I say this, because I would glue and stamp upside down regularly!

It's all together now, but a little boring.
Shall we embellish?

I stamped a snowman and Happy Holidays sentiment from
Charming Holidays Stamp Set ... and colored with Copics.
Admittedly, coloring a wee image is daunting, little dots work well!
I embellished the charm with some bling from
a set of Black Nestabling Sprightly Sprockets, designed by Donna Salazar
I tied the charm to a heart shaped button, and adhered that to a large white button,
and mounted all that on a pretty ornament.

I punched a small hole in the lid, and hung a second {die}Lightfully Charming Circle
and bauble from a Pear Pin.

Finally, I added some Red Pearls around the edges of the lid and the base.
Thanks for joining me today.
I hope you enjoyed this tutorial.
I've linked to most of the products used or their manufacturers,
and tried to give you all the details, without boring you.
Should you have any questions, leave a comment here,
or visit me on FaceBook!
And please, leave me some love, or some tips...
PRODUCTS USED
A Jillian Vance Design
Want2Scrap - Black Nestabling Sprightly Sprockets, designed by Donna Salazar
Buttons Galore - Heart, White Button
Bauble - Tim Holtz
Snowflake Brads - Creative Impressions
Patterned Paper - October Afternoon
Cardstock - Neenah Solar White Classic Crest
Twine - Doodlebug
Please leave a
comment for Allie!
Follow us on Facebook and {Pin It}
twitter: @ajillianvance
6 comments:
This is so adorable!!! Great project Allie!
What a wonderful project, Allie! Congrats on the guest designer spot.
Hugs and smiles
Such creativity! Super cute!!! Guest Designer ... that's AWESOME!!!
Thanks ladies! I had so much fun.
What a darling project! Thanks for the inspiration Allie! *Ü*
Oh My Gosh Allie, that is absolutely gorgeous! As always you have completely inspired me to create my own version.
Post a Comment